Exploring the Targeting Benefits of the Facebook Pixel and Standard/Custom Events
Many companies use Facebook to market and promote products and services, but very few even scratch the surface in terms of taking advantage of Facebook‒s marketing tools and resources, and so they get little value or results from their efforts.
For this reason, many marketers think of Facebook as a sort of necessary evil for marketing, but also a time-zapping quagmire that wastes significant amounts of time and money (if they are experimenting with Facebook ads).
Let‒s start with stating the obvious. With over 2-billion engaged users worldwide, if you are not at least considering or experimenting with Facebook marketing, chances are you are missing out on significant opportunities to build your brand.
The 800-pound gorilla in the Facebook ecosystem is the Newsfeed. The Newsfeed is the rolling list of posts that you see, including those from friends, friends of friends, and others such as paid advertisers, which you can identify because the post will say “Sponsored.â€
How did these sponsored posts get into your feed? There are several ways, but one common way is through the Facebook Pixel.
What is the Facebook Pixel?
The Facebook Pixel is a snippet of code that gets installed on your website in the HEAD tag section. This code essentially creates a connection between those that visit your site and their Facebook feed. So, when a person visits a specific page on your site with the Pixel installed – let‒s say it‒s for a mountain bike they’re interested in that you sell — Facebook captures that interest and the Pixel creates the ability for you to serve a sponsored post (ad) about the bike into this person’s news feed. The caveat: this will only happen if you have created and set up an ad and to be delivered to people who have visited the website page. The Pixel is the way that Facebook knows they have visited your site and can serve the ad.
Here is an example of what the Facebook Pixel code looks like:
Some might think this approach to targeting seems big-brother-ish, but think about it. An individual is in the market for a mountain bike. They visit your website as part of their research. You sell mountain bikes and would love to get your product in front of them for consideration. Assuming you can add value to their customer journey by showing them an ad that gives them more information about something they‒re very interested in, isn‒t that a win/win?
The Facebook Pixel has many benefits, and basic targeting such as the example above is just one. But Facebook targeting can go beyond simply identifying a potential customer because of their visit to your website. At a deeper level, Facebook can track and retarget visitors based on those who take certain actions on your website. This feature is called the Standard/Custom Events feature. By adding a little more code to the Pixel, you can target visitors to your website who take specific actions including page views, registrations, purchases, searches, and more.
We‒re going to take a look at how and why you should use the Facebook Pixel and Events feature to target and track activity between your website and Facebook.
Facebook Pixel Events
Once the Facebook Pixel is installed on your website (see video below on steps on how to do this), as mentioned earlier you can add snippets of code to certain pages to capture and track the details of specific events that you define and are important to you, including registration, purchase, search, email signups, etc.
Once you‒ve added this Standard/Custom Event code information to the Pixel on your site, you‒ll be able to use Facebook‒s Website Custom Audience feature to create specific ways to target users on Facebook, based on their activity.
Installing the Pixel using a PlugIn
Installing the Pixel manually is definitely an option, but, if you’re using WordPress, there are free plugins available that streamline the process and let you do some advanced Standard/Custom Event targeting without the need to alter the code manually. I recommend using a plugin like PixelYourSite or PixelCaffeine. Both are equally as good, have free/paid versions and have great help sections.
After you‒ve created your Pixel, locate the Pixel code in your Facebook Business Manager/Business Settings and enter the Pixel Code ID into your plugin (I‒m using PixelYourSite plugin in this example, see below).
Once you‒ve installed your Pixel code, the next step is to add desired Standard or Custom Events for tracking purposes. Again, the fastest and most streamlined way to to do this is to use a plugin like PixelYourSite or PixelCaffeine, but you can also do this natively through the Facebook Business Manager.
What are Facebook Standard and Custom Events?
Facebook Standard and Custom Events code are additional snippets of code that get added to the end of the master Facebook Pixel code. Once these extra snippets of code are added, this will enable specific pages with that code to capture and track details of an action a user takes, such as a purchase, webinar registration, search for an item, etc.
And that information gets passed through to your Facebook data so you can keep more detailed track of the ROI of an activity. Additionally, once you have an Event set up, you can use the information captured by the Pixel to create custom audiences of people who triggered the event for detailed targeting on Facebook.
For example, if a product page is set with a Facebook Event code snippet to record a visit to that particular page, you can target that person with a product-specific ad in Facebook by building a custom audience based on those that trigger that Event Pixel.
In other words, anyone who has visited that page has triggered the Facebook Pixel identifying that person as someone who is interested in the product, and as a result, someone that is worthwhile for you to target. That creates a highly relevant re-targeting opportunity since the person that visited the product page on your site is now served an ad about that product in their Facebook feed.
Again, I’m not going to cover the specifics of setting up a Standard or Custom event using the Facebook Business Manager, since the plugins make this process much easier. But if you’d like to add the code natively in Facebook, see this link.
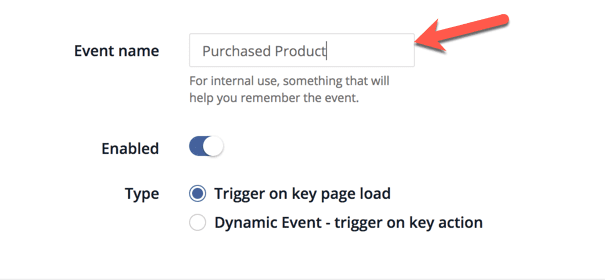
The first step in using a plugin like PixelYourSite is to give your event a name. This really is just for your own identification and doesn’t impact what happens when the code is fired, but it’s important to give it a name that will help you remember the context of why the Event was set up. “My First Event” for example won’t help you six months later when you go back to do research on campaigns you’ve set up.
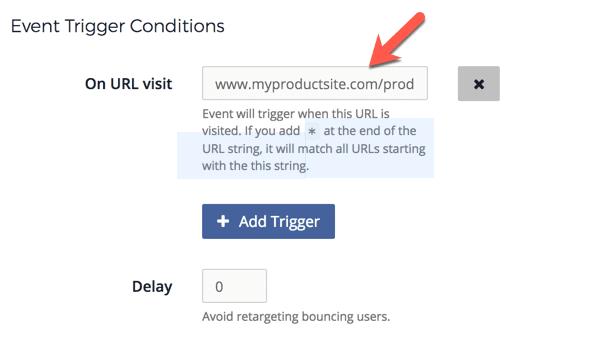
The next step is to set the Event Trigger Conditions. This defines what action triggers the Pixel from firing and is typically a user visiting a web page. You will enter the URL of the page defining the trigger. Make sure to add the wild card character “/*” after the URL so all instances of the page, not matter what code follows the primary URL will be triggered. If you don’t do this, your data will be inaccurate or incomplete.
The final step is to Define the Event you want to track, and Facebook gives you a range of pre-set options in the Standard Event set-up (Custom Events lets you define an event outside of the pre-set options. We’ll cover that in another blog post).
The options include VieContent, AddToCart, Lead, CompleteRegistration, etc. So, for example, if your Standard Event is “CompleteRegistration,” the Pixel will record activity on that page as someone who completed a registration, such as for an upcoming webinar. You can then use this information to serve Webinar-specific ads in Facebook to those who have filled out the registration.

The Facebook Pixel is a must-have tool in the digital marketer’s arsenal today. By understanding how the Pixel works, and how you can take advantage of the benefits of targeting and re-targeting on Facebook, you’ll be well on your way to out-maneuvering your competition and creating a market advantage for your products/services that you would not have if you ignored the value of the Facebook Pixel.

Bill Threlkeld is president of Threlkeld Communications, a content digital marketing and public relations advisory based in Santa Monica, California. Threlkeld Communications specializes in content ecosystem campaigns that integrate PR, Social Media, Blogs, Audio, Video and Email Marketing components.